Suir Blueway VR Experience 2.0 Facilitator’s Manual
Introduction
The Suir Blueway VR Experience 2.0 is a Virtual Reality Kayaking application designed to promote and increase participation in the sport of kayaking. While the application can be used individually it is better suited to be used in facilitated sessions with small groups with a kayaking instructor. This allows the the participant to get the most out of the experience.
The following guide is written for instructors to familiarize themselves with the application before use in facilitated sessions, and will serve as a guide during sessions if needed.
The app was designed for the Meta Quest 2 virtual reality headset. If you have never used a VR headset before we recommend running the “First Steps” app to learn the basics of VR. First Steps can be found in the main app library.
We also recommend reviewing: Getting started with Meta Quest 2 before continuing with this user guide.
Setting up a Play Space
Before launching the app it’s important to setup an adequate play space to avoid injury or damage.
The app is designed to be used seated. We recommended using a chair that does not rotate, has no wheels and has no arm rests that could get in the way of the controller movement.
The app has been used while seated in a real kayak which greatly enhances the user experience.
User Comfort
Before placing the headset on the user, ensure they are seated comfortably. If the user wears glasses have them place the headset over the glasses first then pull the straps back over the their head. Have them adjust the fit and placement themselves until the images they see on the screens are clear.
If the headset is not fitted correctly the images may appear blurry and can have an impact on the user’s experience.
The lenses can be adjusted to suit different IPD (inter-pupillary distance). If the user still finds the images blurry, remove the headset and have them try different settings. There are 3 spacing settings:
| IPD Range | Lens Spacing Setting |
| 61 mm or smaller | 1 (narrowest, 58 mm) |
| 61 mm to 66 mm | 2 (middle, 63 mm) |
| 66 mm or larger | 3 (widest, 68 mm) |
Launching the Application
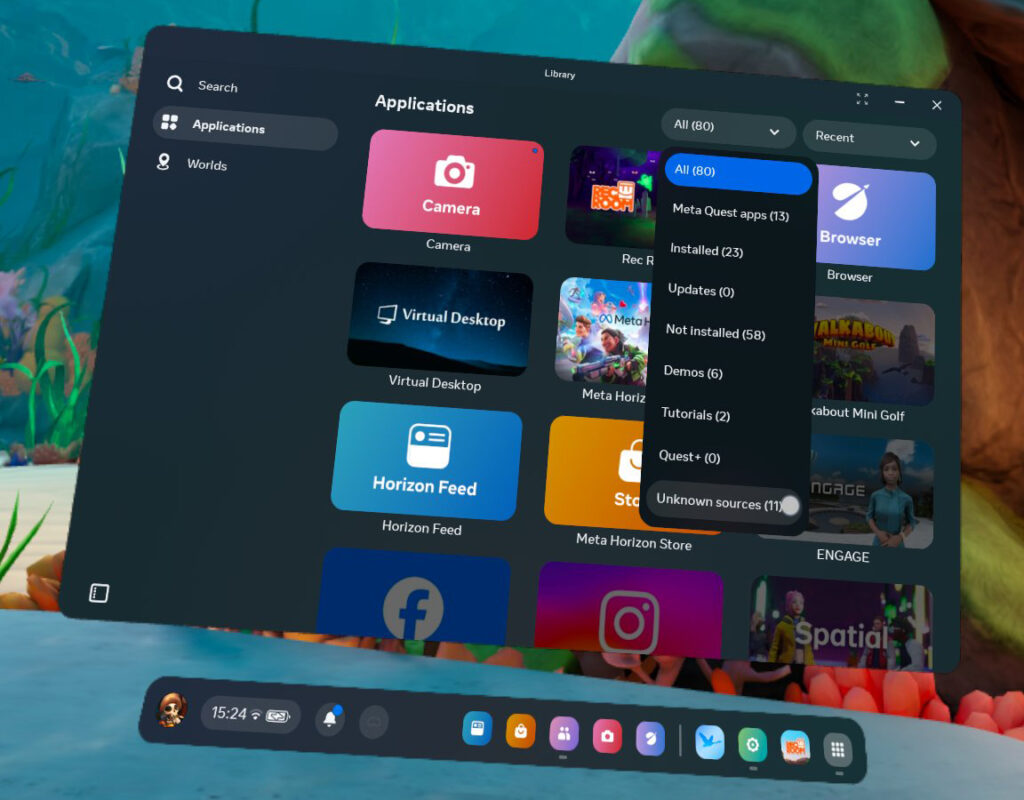
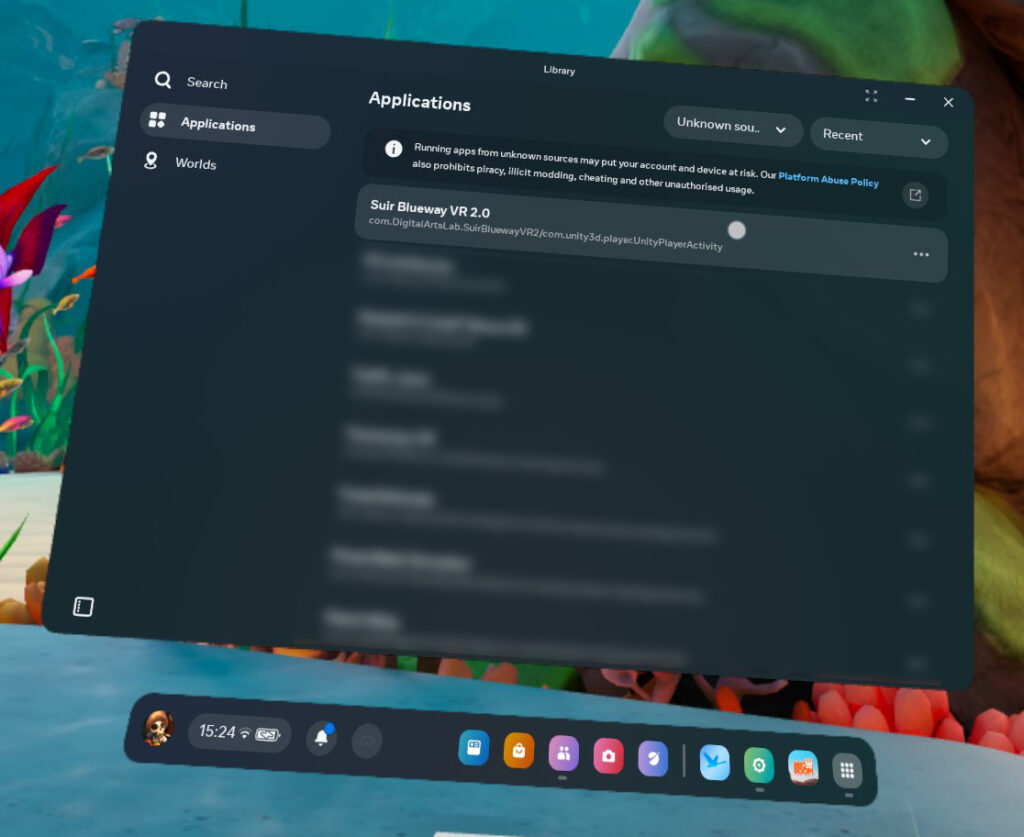
To access the app, go to the app library and choose the filter button and find “unknown sources“. You should then see the app listed. Choose the app to launch.
Paddle Controller Extension
For the best user experience we recommend using a paddle extension for the controllers. This gives the user a more natural rowing technique, however, the app an be used and experienced with just the user holding the quest controllers in their hands.
Using Menus

The menu interface was designed to be interacted with the virtual paddle. You can remain seated and use the end of either side of the paddle to “tap” menu buttons.
When the app first launches you will be presented with questions asking about the users experience. These questions are for analytics purposes only and will have no affect on the user experience regardless of their answer.
First Time in the App
The experience begins after the player answers the kayaking experience question. They will then be introduced to the experience by on-screen text and an accompanying voice over. This is the onboarding experience (tutorial) where the player is taught the very basics of how to row and use the app.
When they have completed this short segment they will have the option to further explore the app by choosing either Free Paddle Mode or Challenges Mode.
We recommend having each new user complete this section of the app first as it will give them time to adjust to VR and kayaking. Once all participants have completed this they will be better prepared to take on guided instruction by the facilitator.
Instruction Mode
If you are running sessions with users who have already used the app, or you wish to skip the tutorial you can do so by looking above your head when the app launches and pressing the “skip tutorial” button.
This places the kayak on the river at the sandy banks location.
We have placed training buoys here which can be used as reference points to direct users to travel to/around etc.
Paddle Modes

The app was designed to suit varying levels of user experience. With that in mind we have 3 different paddle modes which translate roughly to a more traditional digital games difficulty setting, i.e. The default mode: On Rails (Easy), Beginner (Medium), and Expert (Hard).
On Rails
The On Rails mode is the most basic control interface and is enabled by default. In this mode the kayak will move on an invisible pathway or rail and the user only needs to mimic the actions of paddling for the kayak to travel along the river. This mode is great for getting new users accustomed to kayaking in VR and lets them build up their tolerance to VR induced motion sickness.
When you or the user feels they are ready to advance to a higher difficulty you can do so by pressing the BUTTON. The active paddle mode will be displayed on the tablet screen in the kayak.
Once the user moves off-rails the only way to return to it is by resetting the app.
Beginner and Expert
These modes more accurately demonstrate real life kayaking. The user will need to row with correct technique to travel the direction they wish to go and at the speed of their choosing.
Game Modes
Free Paddle

The Free Paddle mode gives the user access to the full river without any objectvies or timers. This mode is perfect for skills building.
While in this mode players can jump to various locations along the river via the menu. The locations are “Sandy Banks”, “Clonmel Town”, and “Slalom Course”.
When moving to each section the player will default to the “On-Rails” paddle mode so be sure to remind the user to select the paddle mode of their choice.
Challenges

The Challenge modes offer the user fun experiences that can help engage them with the experience beyond the instructional element. The challenges can be useful for building engagement through competitiveness and fun.
Time Trial
In Time Trial the timer starts when the user rows across the start line and stops when they cross the finish line. The times are shown on the timer board at the end of the challenge.
Balloon Attack
In this challenge the user starts with a timer counting down. When the timer reaches 0:00 the user has failed the challenge. To complete the challenge successfully the user needs to pop balloons as they row down the river.
The number attached to the balloon is the time in seconds that will be added to their timer. They can use the paddle to pop the balloons.
Make sure they remain seated while playing this mode.
Slalom Course
The Slalom is similar to the time trial in that the timer starts upon passing the start line and ends when reaching the finish line.
However they will need to navigate through the slalom gates as well. Missing a gate will result a a penalty deduction from their final time.
Controller Layout
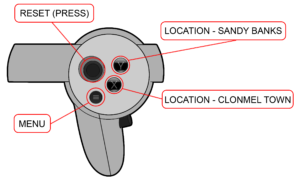
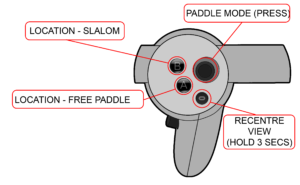
- A – Free Paddle Mode
- B – Location – Slalom
- X – Location – Clonmel Town
- Y – Location – Sandybanks
- Left Thumb Stick Press – Reset App
- Right Thumb Stick Press – Paddle Mode Toggle
- Universal Menu – Open Menu
- Oculus/Meta Button – Hold to Re-Centre View
Motion Sickness
The app was designed to minimize motion sickness as much as possible, though Visually Induced Motion Sickness or VIMS can happen to some users while using VR applications, especially if it is their first time using VR, or they may have a history of motion sickness.
We recommend the following for users:
Start small and take breaks. VR has the potential to be disorienting at first for a new user. Users should start with shorter sessions of five to 10 minutes and gradually increase the duration as they become more comfortable. Whenever they do feel any early onset symptoms of motion sickness, they should take a break immediately.
Drink water and don’t eat a big meal. Staying hydrated is good common sense that is also important when using VR. Users should avoid having a big meal, as well as greasy or spicy foods, before putting on the VR headset.
If a user experiences nausea, have them remove the headset and remain seated until they feel comfortable enough to move. Drink water and get some fresh air.